

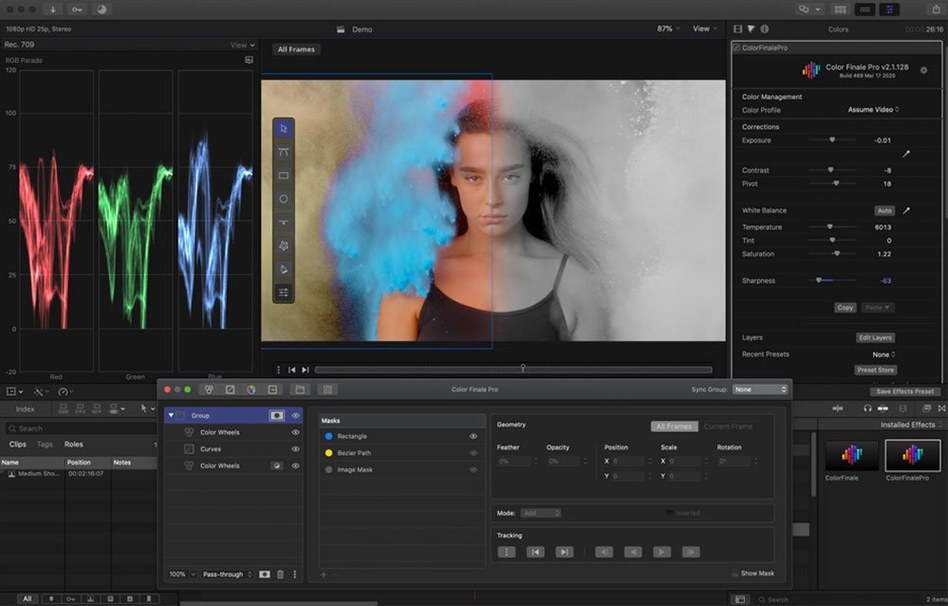
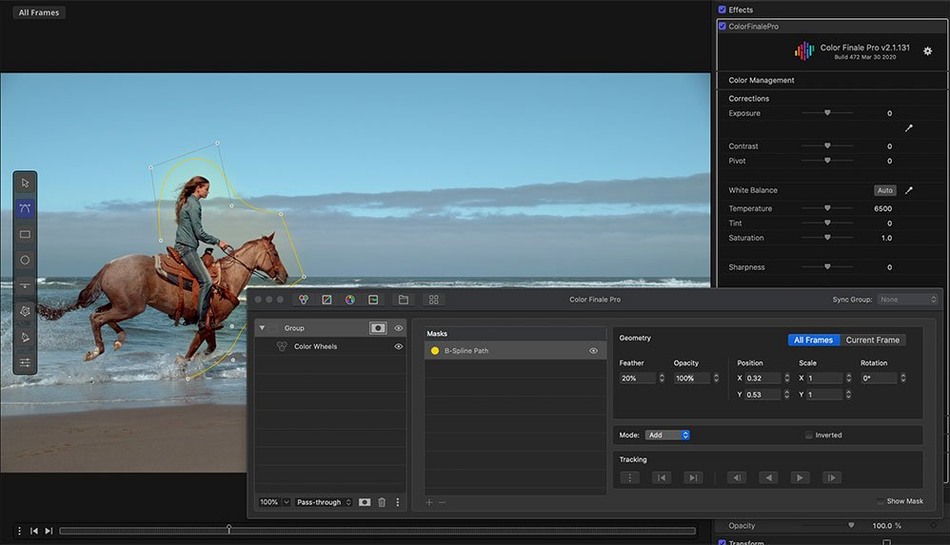
You drop a flat S-Log3 clip onto the Final Cut Pro timeline and the first thing that hits you is how much room there is to push the mids without breaking the shadows. Color Finale sits in the effects inspector waiting for a signal, and the fastest way to get one is to reach for a curve.
- Drop a point on the Luma curve. Click the center to pin the midtones, then pull the lower third down gently. The blacks deepen without crushing, and the waveform monitor confirms you have kept detail near zero.
- Open the HSL Curves tab. Instead of a global saturation slider, you isolate the hue range that matters. Select the blue-cyan arc and lift the saturation node. The sky gains weight while skin tones stay exactly where they were.
- Shape contrast with the Hue vs. Luma curve. Pick the green-yellow band and nudge the luma down. Foliage recedes naturally, and the subject in the foreground holds the eye because the luminance hierarchy now reads correctly.
- Apply a look through LUT Utility. Load a film print emulation as a final creative layer. Because the corrective curves sit upstream, the LUT receives a balanced signal and the baked contrast lands precisely where the emulsion expects it.
The whole adjustment lives as a single effect instance in the inspector, with every point animatable for keyframed shifts across a cut. If you build looks by feel rather than by numbers, the curve-based workflow gives you the tactile feedback that slider-only panels often lack.
First Days With Color Finale: What Actually Helps
You install the plug-in, drop it on a clip, and immediately feel the urge to twist every wheel in sight. That’s normal. The next day, you open the project and wonder why skin tones look like bronze statues. A few habits early on keep you out of that corner.
Work in a dim, neutral room. Color Finale’s scopes become your anchor, but your eyes still need a fighting chance. Turn off any bias lighting that leans warm or cool, and pull the blinds. The very first day, you are calibrating your perception as much as your monitor.
Build a correction sandwich. Before you reach for the color wheels, place a simple exposure adjustment layer upstream of your grade. In Final Cut Pro, stack a second Color Finale instance just for a basic luma curve that sets black and white points. Keep it separate from your creative look. A week later, when the client asks for a brighter version, you tweak one node instead of re-anchoring every ball.
Save nothing until you have watched it on a phone. Mac displays handle wide gamut effortlessly; Instagram does not. Export a one-minute test to H.264 and view it on a device you actually scroll on. The reds that glowed on your desktop often turn muddy in a compressed delivery, and Color Finale’s HSL curves let you pull saturation out of the problem band without touching the rest.
Resist the preset store for the first three projects. The ASCEND presets are well-crafted, but dropping one on a shot you have not yet balanced teaches you nothing about why the image works. Spend those first sessions building a look from scratch with only the color wheels, a single curve, and the vectorscope. You will recognize a bad preset the moment it loads, because you will know what the clip needed before you applied it.
Matching S-Log3 and D-Log to a Single Warm Look
Monday morning, a short film rough cut lands in your timeline. The footage is a mix of Sony A7S III in S-Log3 and a DJI drone shooting D-Log. Nothing matches, and the director wants a warm, late-afternoon feel across all of it.
You park the playhead on a medium shot of the lead actor, open Color Finale, and ignore the wheels. The first sixty seconds belong to the waveform monitor. You add a luma curve node, drop a point at 60% to anchor the skin-tone exposure, and lift the shadow end until the jacket fabric separates from the background wall. The parade scope confirms the red channel is not clipping in the highlights, so you leave the upper range alone.
Next, the vectorscope. The actor’s face sits outside the skin-tone line, pulled toward yellow-green by the log profile. You open the primary color vectors, drag the hue offset toward the orange quadrant, and watch the signature tighten. You add a second vector adjustment for saturation, boosting only the quadrant that contains the warm tones while leaving the cyans alone — the drone shots have sky you do not want to overcook.
With the base correction locked, you switch to the HSL Curves tab. The director’s afternoon look lives in the amber range around 30 degrees. You select that hue arc, lift its saturation gently, and pull the adjacent yellow-green saturation down so the grass in the drone aerials does not fluoresce. A Hue vs. Luma curve darkens the same yellow-green band, giving the fields a golden-hour weight even though the drone pilot flew at noon.
Now you copy the effect. You select the graded clip, hit copy, then paste attributes onto every shot from the same camera. The drone footage gets a similar treatment, but you adjust the luma curve to match the contrast profile. By the time you open LUT Utility and apply a Kodak 2383 emulation as a final layer, the whole timeline breathes like a single camera.
Grading the Browser Clip by Accident
Grading with the clip selected in the browser instead of the timeline. Color Finale applies to timeline clips. If you have the browser clip highlighted, the inspector shows empty air and you will stare at a grayed-out interface thinking the plug-in broke.
Stacking LUTs without reading the signal they expect. A LUT designed for Rec.709 will choke on log footage. If you feed it S-Log3 straight from the sensor, shadows clamp and highlights blow before your creative adjustments even begin. Do the log-to-Rec.709 conversion upstream, inside Color Finale’s own curve panel, then apply the look LUT.
Ignoring the layer order. Color Finale processes adjustments from the bottom of the stack upward. A saturation boost placed below a contrast curve behaves very differently from one above it. New users often drag layers around randomly and blame the plug-in when the image turns to posterized mud.
Relying on the viewer alone. The Final Cut Pro viewer lies. It lies about contrast, about saturation, about luminance relationships. If you are not checking the waveform and vectorscope every few adjustments, you are grading blind. Color Finale places its scopes prominently for a reason.
Downloading cracked versions from unverified sources. Searches like color finale 2 pro crack or color finale torrent pull up builds that often ship with missing presets, broken LUT Utility modules, or altered framework files—so it's worth checking that all companion components are present and the framework handshake is intact before launching Final Cut Pro. A color finale 2.5 free download that predates the current 2.x line can also run beautifully once you confirm it's compatible with your macOS security layers. The plug-in relies on a companion application for its framework, and verifying that connection is a smart first step.
Scopes Appear Automatically on Every Effect
Before you grade a single frame, open the Color Finale application from your Applications folder and head to Preferences.
- Turn on "Show scopes by default." Every new effect instance opens with the waveform and vectorscope visible. You can hide them later, but having them greet you on launch forces a good habit.
- Set the default working color space. If your timeline is wide gamut HDR, tell Color Finale upfront. The tool respects the Final Cut Pro library setting, but explicitly matching it here prevents odd gamma shifts when you import LUTs authored for a different space.
- Disable automatic LUT conversion. Color Finale can attempt to interpret a LUT’s input space automatically. It guesses wrong often enough that you are better off assigning the input gamut manually in the LUT Utility panel each time.
- Map your most-used curves to the toolbar. The default panel layout exposes everything, which is clutter. Hide the tools you rarely touch — like the secondary color keyer — and keep the HSL Curves and Luma Curve one click away.
- Switch the interface language if needed. The plug-in supports English and Simplified Chinese from the same build. If you collaborate with editors who prefer one over the other, a quick toggle in preferences avoids confusion mid-session.
The plug-in rewards patience. Give it a week of careful listening to the scopes, and the interface starts to feel less like a panel and more like a mixing desk you know by touch.
- macOS 10.12 or later
- Intel or Apple silicon Mac
- Final Cut Pro X
Questions I actually get
Does Color Finale work on Apple silicon Macs?
Yes, Color Finale 2 runs on both Intel and Apple silicon Macs and installs as a video effect plug-in for Final Cut Pro and Motion.
Porch talk 0
Come in or pull up a chair to leave a comment.
Nobody has pulled up a chair yet. If you used it on a real Saturday, say what the hour was.
More for the same hour
Everything in Mac Apps
 Coherence X
6.1 Mac Apps
26 MB
Coherence X
6.1 Mac Apps
26 MB
 Color Folder Pro
5.5 Mac Apps
23 MB
Color Folder Pro
5.5 Mac Apps
23 MB

 Cocktail Sequoia Edition
18.7.1 Mac Apps
3 MB
Cocktail Sequoia Edition
18.7.1 Mac Apps
3 MB

 Command-Tab Plus
2.9.9 Mac Apps
8 MB
Command-Tab Plus
2.9.9 Mac Apps
8 MB

 Commander One PRO
3.18.0 Mac Apps
Updated 53 MB
Commander One PRO
3.18.0 Mac Apps
Updated 53 MB

 CloudMounter
4.18 Mac Apps
68 MB
CloudMounter
4.18 Mac Apps
68 MB

 Clip Studio Paint
4.1.4 Mac Apps
403 MB
Clip Studio Paint
4.1.4 Mac Apps
403 MB

 Compressor
5.3 Mac Apps
122 MB
Compressor
5.3 Mac Apps
122 MB